 If you have never installed a CO2 cryo jet system it may seem like a daunting task. After you read through this short paragraph you will know all the ins and outs of installing your own CO2 cryo system with either high pressure tanks or low pressure Dewar tanks. All the pros in the special effects world understand it doesn't take years of experience to install the CO2 cryo jets manufactured by Atlanta Special FX. These cryo blasters are engineered to save you time and money. They can be mounted in a variety of positions allowing for easy setup in all types of venues.
- Do your best to stay at 50-70 feet or less from your tanks when using low pressure Dewar tanks. (Closer is better)
- Try to keep a direct line between your cryo jets and your tanks. (The less 90 degree turns the better)
- When using high pressure tanks you can use longer hoses (But if the CO2 sets in the hoses for extended periods of time between shots you will experience the noise before the white fog comes out)
- It is optional to use T fittings and attach multiple jets to a single hose.
Now that you have decided the location of tanks and the location of cryo jets, you will need to distinguish between the cryo hose ends to determine which hooks to which. The brass end is a standard CO2 fitting and attaches to the liquid CO2 bottle and the silver end attaches to the cryo jet. Once you have attached your hoses you will now need to determine how you will power the jets on and off. Most industry professionals use a 4 channel DMX dimmer / switch kit. (Sold Separately). Others use items such as foot switches, push button firing systems, and even as manual as a surge protector. The cryo jets only need a simple on off signal. When the jet is on, CO2 plumes of fog will shoot from the nozzle and when they are off there will be no noise or fog. The last things you will want to do are test fire the jets, without the gas on, listening for the clicking on/off sound. Once you have tested the on/off it is time open your CO2 bottle. Be sure the cryo unit is off, open the valve on top of the CO2 bottle all the way and the line will pressurize. It is always good practice to leave the bottle closed until just before you need the effect. This will ensure a nice, instant plume of fog when you power the CO2 fogger on.
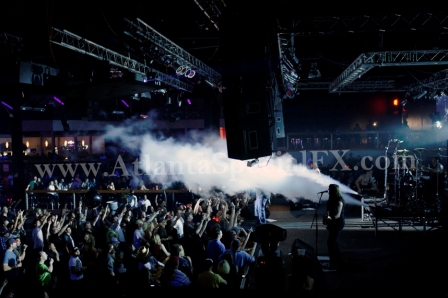
CO2 fog is a great way to entertain your guests as well as provide stunning visual and audible effects while cooling the room down. This is why CO2 foggers are a popular item for any nightclub venue.
We hope this article has shed a little light on your CO2 jet purchase. If you have questions or comments, a professional technician is always standing by to assist you.
To order your own CO2 cryo cooling system contact:
Atlanta Special FX
404-644-2801
or visit the CO2 cryo page direct at http://www.atlspecialfx.com/collections/co2-cryo-fog-smoke